(updated: 2017-03-14)
QAVideos is a Question and Answer application that uses videos instead of text. Think of QAVideos as StackOverflow meets Youtube. QAVideos will use LoopBack, API Connect, Open API Initiative (OAI formerly Swagger.io), OpenWhisk, Object Storage.
Requirements:
- Install Node.js
- Node.js comes with npm, but you can update npm
$ npm install -g npm@latest - Install StrongLoop (now renamed to API Connect).
$ npm install -g apiconnect
- QAVideos (1) – Adding User Management to Node.js. Part 1 creates the ‘StrongLoop’ application with built-in User and Role management with authentication, with an API layer based on Open API Initiative (OAI), formerly Swagger.io, and I add an Angular.js based web UI.
- QAVideos (2) – Add Custom Model and ORM to Node.js. Part 2 adds custom object models and ORM to a PostGreSQL database.
- QAVideos (3) – Extend Model and Using Swagger.io in Node.js. Part 3 adds object model extensions and takes a closer look at Open API Initiative (OAI) support.
Steps:
- Application Design
- Create the Application
- Add Static Pages
- Add Angular
- Add Signup
- Create an Authentication Service Provider
- Add Login
- Add Logout
1. Application Design
The initial design of the QAVideos application is very simple. A user can register, login and logout. An authenticated user can create, update and delete videos to the platform and see a list of their videos. Unauthenticated users can see all videos.

About StrongLoop
If you are not familiar with IBM API Connect (formerly StrongLoop), it is an API platform for Node.js and includes Loopback to quicly compose and manage APIs, and use graphical tools like the API Connect Designer to create, edit, manage and deploy your APIs. I will use the Loopback library that is part of API Connect to compose the model and the APIs.
You must install the API Connect cli for this tutorial. Test to see if you have API Connect cli installed:
$ apic -v

API Connect: v5.0.6.2 (apiconnect: v2.5.21)
2. Create the Application
To initialize the application as a Loopback application, on your localhost, open a new command line and use the API Connect command line interface tool ‘apic’ to create a new application with application name ‘qavideos’.
- Accept the default name ‘<username>-qavideos’,
- Select the kind of application: ‘notes (A project containing a basic working example, including a memory database)’.


When StrongLoop finishes initializing the ‘qavideos’ application successfully, you can start the application from the commandline:
$ node .
or
apic start
You can open the application in a browser and use API Connect’s Designer tool to look at the APIs.
node .

Web server listening at: http://0.0.0.0:3000
If you used ‘apic start’ look at the log:
Service remkohdev-qavideos started on port 4001

Service remkohdev-qavideos-gw started on port 4002
To start the API Connect Designer, run the command ‘apic edit’,
apic edit
Login to Bluemix or register for Bluemix in order to use the free ‘API Designer’ tool:

After you login, you see the APIs that are being managed by the API Designer, currently only the ‘remkohdev-qavideos v1.0.0’ was created.

Go to the Explore button, to see the generated API documentation.

Under the Paths, you will see two resources listed: Users and Notes. Users is a built-in Model in LoopBack, Notes is a custom Model in LoopBack. Only the Notes Model is publically visible.
Start the application with ‘apic start’
apic start

Service remkohdev-qavideos started on port 4001

Service remkohdev-qavideos-gw started on port 4002
and in a browser open the URL ‘http://0.0.0.0:4001.’

Open the generated application in your IDE, e.g. in Sublime,

This response message with the server status is defined in the ‘~/server/boot/root.js’ file. This file is the default boot script of a base LoopBack application. All files in the ‘~/server/boot/’ directory with a .js type extension are executed at startup in alphabetical order. The code returning the server status is:
3. Add Static Pages
Instead of responding via the dynamic routing, I want to serve static pages from a ‘~/client’ directory with an ‘index.html’ page or view, and with a ‘views’ subdirectory with additional pages or views.
First, disable the ‘~/server/boot/root.js’ file, by renaming it to ‘root.js.disabled.’ Next, open the ‘~/server/middleware.json’ file and look for the ‘files’ node, replace it with the following code.
This code tells StrongLoop to use ‘static’ pages from the ‘client’ directory.
The last thing to do is to create a simple ‘~/client/index.html’ page.
Now restart the application via the commandline with ‘apic start’ and open the address ‘http://0.0.0.0:4001’ in a browser, you should see the static page with an H1-title ‘My Videos’.

4. Add Angular
You now have a simple QAVideos application with a static home page but without any data or real functionality. To add the functionality to register, login and manage content, I will first add support for Angular.
Angular supports data binding to send data between client and server. LoopBack provides an AngularJS JavaScript SDK when you install StrongLoop. The SDK provides AngularJS services, like client-side representation of the models and remote methods on the server, command-line tools like lb-ng and a Grunt plugin.
Generate the Angular services script
To generate an Angular services script that binds data to the StrongLoop model, run the following commands from the command-line.
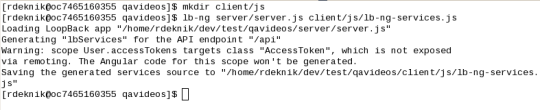
Currently there is the built-in User model and a pre-generated custom Notes model in QAVideos. I will use the built-in User model to add user management to QAVideos. The lb-ng command here generates a ‘~/client/js/lb-ng-services.js’ JavaScript file, which includes the binding SDK between Angular and the LoopBack model.
I have to load this ‘lb-ng-services.js’ JavaScript file in your pages.
I also have to include the Angular scripts and the UI Router script in your html. Install both packages using npm:
npm install --save angular@1.6.3

npm install --save angular-resource@1.6.3

npm install --save angular-ui-router@0.4.2
From the ‘~/node_modules’ directory, copy the ‘angular/angular.js’, ‘angular-resource/angular-resource.js’, ‘angular-ui-router/resources/angular-ui-router.js’ and ‘angular-ui-router/resources/angular-ui-router.js.map’ to a new directory ‘~/client/js/angular/’.
cp node_modules/angular/angular.js client/js/angular/

cp node_modules/angular-resource/angular-resource.js client/js/angular/

cp node_modules/angular-ui-router/release/angular-ui-router.js client/js/angular/
In the ‘~/client/js’ directory, create a new file ‘app.js’, which is the main JavaScript file of your Angular client app, and add the ‘lbServices’ module to the angular.module() call, as follows:
Modify the ‘~/client/index.html’ page. Change the html-tag to include the ‘ng-app=”app”‘ attribute, and include the Angular client app.js script and the Angular scripts to the bottom of the body:
You now have added basic Angular support for the sample app. You can test if your Angular support is working, by adding the following code.
From the commandline run ‘apic start’.

5. Add Signup and Login
Now we can add Signup and Login functionality. To add the signup functionality to QAVideos, I need to add:
- a signup page,
- a signup-success page,
- a link and route from the index page to the signup page,
- a link in the signup form to submit to the signup function in a signup controller, and
- a signup controller, which implements the code to register the new user,
- a sign-up-success state,
- a route to the sign-up-success page when the state changes to ‘sign-up-success’, and
- a sign-up-success page
Create the following directories: ‘~/client/views/’ and ‘~/client/js/controllers/’. In the ‘~/client/views/’ directory, create a new ‘sign-up-form.html’ page and add the following html.
In the same ‘~/client/views/’ directory, create a ‘sign-up-success.html’ page.
Edit the index page, remove the Angular test tags, and add the following navigation and view tags.
Your complete index.html page should look as follows:
If you look at the code you added to the index page, at the end you added a line with a main-tag and a ‘ui-view’ attribute. This is an Angular property from the Angular ‘ui-router’ or ‘UI Router’ module. This module handles routing by using so-called states. You already included the ‘UI Router’ JavaScript library in the ‘index.html’ as instructed earlier.
The nav-tag includes a list of li-tags. The signup list item has an attribute ng-hide=”currentUser”. This attribute tells Angular to hide this item if there is a currentUser data object bound, so that if we bind a currentUser data object to the page in case a user is logged in. The ng-show attribute on the logout list item works the opposite way, showing the logout list item when there is a currentUser data object.
The anchor-tags have each two attributes, in case of the logout anchor, there are ui-sref=”logout” and ui-sref-active=”active”. The ui-sref binds a link to a state. The state concept is used by the UI Router module to track the state of your pages and navigate the application. You change state by using the $state.go() function in the StateProvider in the app.js, which I will define below.
Restart the video-app now, you should see the sign-up and login links on the homepage, but they are not active.

To make the sign-up link active, I must add support for the UI Router module and add a ‘state’ object in the ‘app.js’ client script. This ‘state’ object is bound to the link in the ‘index.html’ via the ‘ui-sref’ attribute, when the ‘index.html’ page loads.
First, open the ‘app.js’ file and add UI Router support by adding the ‘ui.router’ module. Then add states in the ‘app.js’ file by adding a config array with a ‘State Provider’ object, ‘UrlRouterProvider’ object, and a function that adds one or more states to a ‘State Provider’ object, as follows.
Reload the video-app, you should see the active sign-up.
Look at the ‘sign-up’ state you added in the ‘app.js’ Angular file, it consists of an active ‘url’, ‘templateUrl’, which is a relative link to the previously created sign-up page, and the ‘SignUpController’, which is a controller object that I will define next.
Click the link, it should change states to ‘sign-up’, which should load the ‘sign-up-form.html’ template, and change the url to ‘http://localhost:3000/#/sign-up’.

To complete the sign-up process, the user needs to complete the sign-up-form, submit it, and this should call a ‘register’ function in the ‘SignUpController’ that creates the new user object, so that when logging in, the app can authenticate the login values against existing users.
In the ‘SignUpController’, you control state, scope and add functions you can call from within the page to which the controller is added. In case of the ‘sign-up’ form, we specifically want to add a ‘register’ function to the scope that is called when the ‘sign-up’ form is submitted and creates the new user object.
Create a new file ‘~/client/js/controllers/auth.js’, define a controller ‘SignUpController’. In the controller, pass $scope and $state objects, and in the controller function, define a register() function. For now, all we do in the register function is change the state to ‘sign-up-success’.
You must add the ‘~/client/js/controllers/auth.js’ file to the script includes in the index.html page.
Next, add the ‘sign-up-success’ state to the ‘~/client/js/app.js’ file.
The ‘sign-up-success’ state routes to the ‘templateUrl’, we already created the matching ‘sign-up-success.html’ template above. Now, when you restart QAVideos, you can click ‘sign-up’, submit your ‘sign-up’ form, and you are taken to the ‘sign-up-success’ page.

Because we did not actually create a user in the ‘register’ function, no actual user was created yet, so that is what I will do next.
Create an Authentication Service Provider
To implement the authentication services for sign-up, login and logout, I will create a so-called Provider. Angular is built around the design pattern of Dependency Injection and uses Providers to allow developers to wire the parts together. The controller we defined earlier is a Provider of type ‘Specialized Objects’, which conform to the Angular defined API. Developers can also write objects that conform to a developer defined API, these Providers are of type ‘Services’. I will write here a Authentication Service.
The Angular injector service can create a service object defined by the developer. So-called recipes tell the injector what type of object to create, the most common is the Provider recipe, the other 4 recipes are Value, Factory, Service and Constant.
I will create a Factory service to function as the Authentication service for my QAVideos app. Create a directory ‘~/client/js/services/’ and in it create a new file ‘~/client/js/services/authFactory.js’. In it, I use the ‘.factory’ method to create a service named ‘AuthService’, in it is defined a register() function that creates a new user with a required email and password based on the built-in User model.
The $q parameter is an Angular service that implements so-called promises to be run when an asynchronous method returns the result. When you call the AuthService provider, the calling method obliges to handle the promise.
Include the ‘authFactory.js’ script in the index.html scripts.
In the ‘~/client/js/controllers/auth.js’ file I add the ‘AuthService’ to the ‘SignUpController’, and call the AuthService’s register function to create a new user. Note I also added the ‘AuthService’ in the ‘.controller’ signature.
In the above code, you add the AuthService provider to the controller function, and call the register function on the AuthService. As the calling method to the AuthService, you oblige to handle the promise in the ‘.then()’ function. In this code, we change the state to ‘sign-up-success’ onsuccess, and on error we do nothing for now. When a user successfully signs up, the ‘sign-up-success.html’ page loads.
Restart QAVideos with the command ‘apic start.’ You should now be able to successfully register a new user. We cannot test it yet, because we need to add the login functionality to verify this.
6. Add Login
To add the login functionality, I need to add:
- a login template,
- a login state object to route the user from the ‘index.html’ to the login form,
- a login controller function that is called when the login form is submitted,
- a login method to authenticate a registered user in the ‘AuthService’ provider,
- a state to route back to the ‘all-videos.html’ template with a ‘logged in’ status when a user logs in successfully, and
- an ‘all-videos.html’ template.
First, create a new file ‘~/client/views/login.html’.
We already added a login and logout link in the ‘index.html’. However, to make the login link active, as with the ‘sign-up’ link, I will add a login state to the ‘app.js’ configuration.
Next, define the ‘AuthLoginController’ that runs the authentication for the login functionality. Open the ‘~/client/js/controllers/auth.js’ file, and add an ‘AuthLoginController’, similar to the ‘SignUpController’ as follows.
In the controller, I call a login function on the AuthService. Open the ‘~/client/js/services/authFactory.js’ and add the login function, make sure to add the login function to the return object.
As you see in the code, when the user is successfully logged in, ‘.then(‘ a ‘currentUser’ object is added to the $rootScope object. This means, that now, in the index.html page, Angular will bind the currentUser object to the page
Because, on successful login in the AuthLoginController we change the state to ‘all-videos’, add it to the ‘app.js’.
To complete the Login functionality, add the ‘all-videos.html’ template. Create a new file ‘~/client/views/all-videos.html’.
Restart QAVideos with ‘apic start/, then signup, and login. When successfully logged in, you are taken to the ‘all-videos.html’ page.

Add Logout
By now you should pretty much be able to add the logout functionality all by yourself. 😉
The logout link in the index.html page was already added, but it is inactive. I need to add a logout state to the app configuration in the ‘app.js’ file.
Now add the ‘AuthLogoutController’.
Add the logout function to the AuthService.
You are finished adding user management to QAVideos by adding signup, login and logout functionality to the built-in User model in StrongLoop using Angular.js.
Restart QAVideos to signup, login and logout.
Source code: https://github.com/remkohdev/qavideos/tree/v1.0.0
In part 2, I will add custom models to QAVideos and add ORM to a persistent data storage.
In part 3, I will extend the models and add support for Swagger or Open API Initiative.
Following parts will expand the QAVideos application further.